It can be intimidating for beginners to learn how to get a good lighting system for their videos. The lighting of your video shoot can be a challenge if you’re just getting started with video production. Light is perceived differently by our eyes compared to what is seen through a camera lens. It takes way more light than you might think for a camera to capture a high-quality image. Furthermore, it must be coming from the right angle. However, live video lighting is not something to be scared about. In this lighting guide, we will walk you through everything you must know to achieve the perfect lighting for your streams.
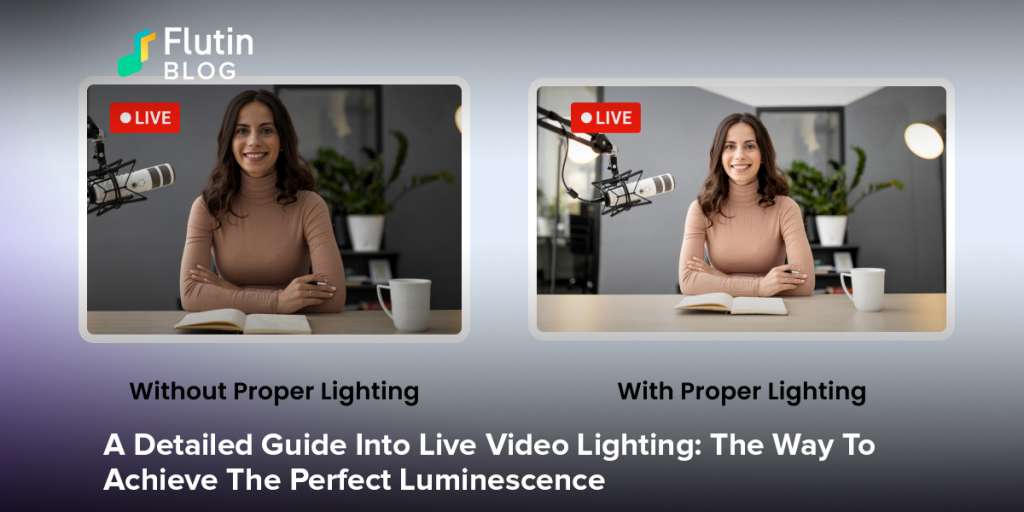
It can be challenging to find the right live video lighting. The objective of live streams is to create engaging content, set the mood, tell a story, interact in real time with your audience, and nurture your loyal following. You can make your live streams more professional and attractive by getting your lighting system right. Your live streams will also be enhanced by adding depth and character, lighting you (the subject), and adding layers and dimensions for a better experience. This lighting guide will teach you everything you need to know about live video lighting.
Should you care about live video lighting?
To gain a great deal of engagement with your content, it is imperative that your lighting is set up correctly. Live video lighting improves the picture quality, makes the subject(s) pop, and gives viewers a visual pathway to focus on what you want them to see.
Things to consider while choosing a lighting system for your live streams
Depending on their live streaming stage and environment, every live streamer has unique lighting requirements. The following factors may influence the lighting you choose for the live stream.
1. The environment
When choosing live video lighting, take your environment into account. Live streaming can take place at home, at work, and outdoors. If you’re live streaming indoors during the daytime, the sun-kissed windows may be a blessing. Taking advantage of them is a good idea in that case. You can, however, think about the layout of your room, the desk position, and your background for ways to improve your environment. You might find that daylight can be used for video production, or even opt for advanced lighting setups that include LED lights, RGB lighting, green screens, and more.
2. Your budget
Budget considerations are important here when it comes to live video lighting. In the absence of caution, you could easily get sucked into a never-ending list of things to buy, invest in, and do. Even returns may not be guaranteed. It is highly recommended that you spread out your maximum budget as follows: low, mid, and maximum. Thus, even if you stick to your budget, you still have wiggle room.
Lighting products such as LEDs and ring lights as well as tripods and green screens are available at various price ranges. Our recommendation for newly started live streamers is to stick with low or mid-range options. Upgrades are always possible later.
Avoid buying a light simply because it’s inexpensive. Your lighting goals will likely never be met if you purchase multiple lights over time.
3. Sources of lighting
Light sources are essential for live streaming. The video quality of your live stream depends on them. A light source can be either artificial or natural. It’s your choice how technical and detailed you want to get with your options. Our take on it, however, will be simple:
Artificial : Artificial light options include continuous lighting (like the ones used for photography), LED lighting (for both 2-point lighting and 3-point lighting), and so on. Additionally, add coloured RGB lights or LED strobes to your monitors’ backs as part of a studio makeover.
Natural : Light from natural sources (with LED backups) should be used in large open rooms with large windows. You can also use natural daylight with a tripod-mounted ring light if you want to use one-point lighting during the day. Simply make sure to stand directly across from (or slightly off from) the window to prevent sharp shadows or silhouettes from detracting from your live broadcasts. If, however, your schedule prevents you from working during the day, you will unquestionably require backup. Additionally, it will be crucial if you work in a dimly lit, enclosed space.
4. Accessories and equipment
You might require lighting accessories in addition to the bare minimum. These could be anywhere from extension cables and light diffusers to reflectors and additional lighting stand, among others.
5. The temperature of the colour
When you live stream, lighting may appear “warm” or “cold” because cameras perceive light differently than human eyes do. Warm lights lean toward yellow, whereas cool lights typically feature white or blue tones.
The majority of modern technology has colour temperature adjustment capabilities, including ring lights which are used for live broadcasting. For instance, you can utilise the “one-light arrangement” if you’re live broadcasting but don’t have access to natural light. The LED bulbs on ring lights can then have their colour temperatures changed to represent settings that are as similar to daylight as feasible (say 7000K to 9000K).
What is the 3-point lighting system?
The 3-point lighting system is the go-to technique for the majority of the streamers out there. This lighting system consists of three essential components, which are as follows:
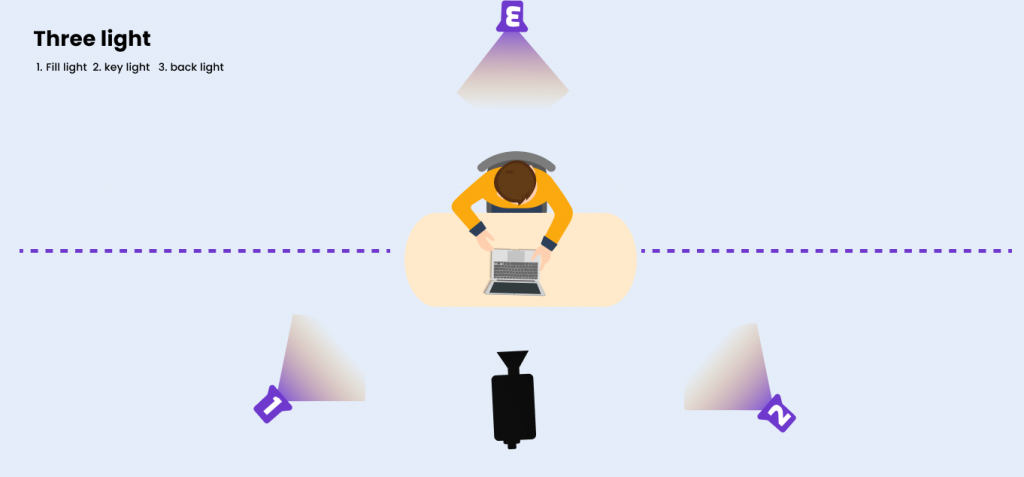
- Key Light: The key light, which is typically positioned towards the subject and somewhat off-camera, is the main light that is concentrated on the subject (for instance, you). As a result, the other side of your face will be in the shadows (adding more layers of depth and character). The key light is used to uniformly illuminate your face.
- Fill Light: The shadows cast by the key light is where a fill light comes in. This secondary light illuminates the remaining area, generating a shadow that is “high-contrast and film-noir” in style. You can alter the fill light’s brightness or dimmers to suit the scene’s atmosphere.
- Backlight: Also referred to as “hair light” or “rim light”, the backlight aids in defining the shadows that surround the subject’s head. As a result, it visually distances the subject from the background, giving the impression of depth.
What are some other lighting systems?
There are numerous variants of the above-mentioned 3-point lighting system, some of which are as under:
- 1-Point Lighting System
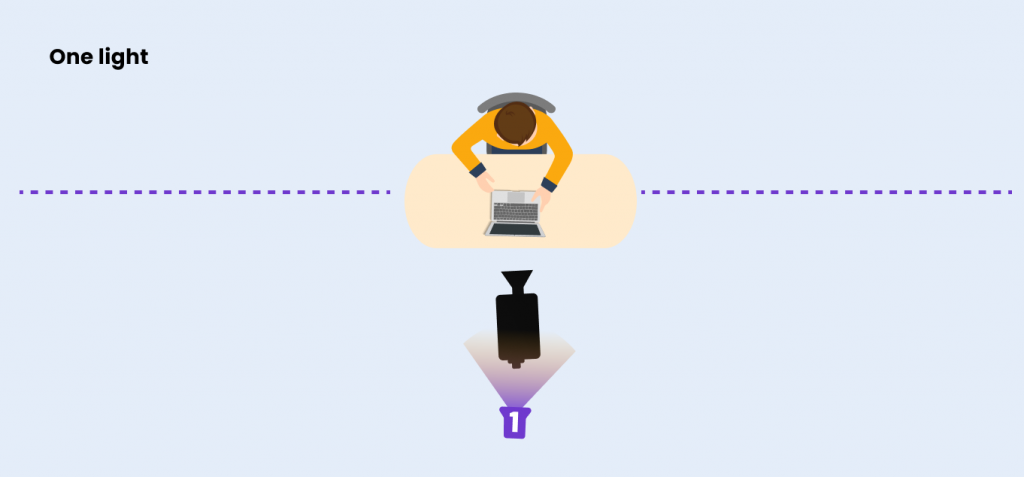
A single source of lighting is used in this basic lighting setup to illuminate the opposite side of the subject, typically from behind the camera. It can be fixed to the ground, a desk, or another surface (like on the wall).
- 4-Point Lighting System
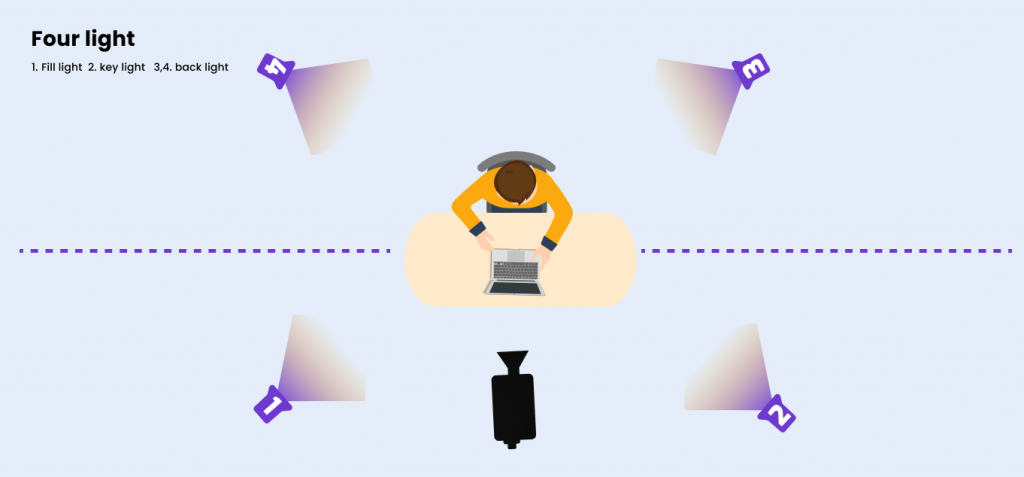
In this form of lighting, the background that is directly behind the subject is illuminated.
- 5-Point Lighting System
It possesses all of the components required for a typical 3-point lighting setup. It can accommodate additional lights as well, like an extra background or key or fill light or any combination of these.
What are some live video lighting options at your disposal?
Natural lighting will be unquestionably used when you are outdoors, whether with or without reflectors. Your DSLR cameras may occasionally require diffusers and ND filters.
Are you searching for lighting in the marketplace? You may either get individual lighting sources or complete kits, depending on your choices and requirements.
You should take into account a few more factors of live broadcasting, though. Just keep in mind that this is about live streaming and not indoor or outdoor video production. Live broadcasting is much more spontaneous. The finest lighting can be achieved, though, by setting up a home studio where you can be in control of your surroundings.
For example, you would need to think about whether you typically live stream “on the move” or indoors. To put it simply, you need to consider whether you’ll need a portable setup or a fixed system or both. You would also need backup plans in either case.
It’s possible that you won’t get everything correctly the first time. We advise you to think of live video lighting as a continuous process of trial and error. As usual, begin with the simplest live video lighting configurations. For instance, you may start by setting up from across a window and utilising natural lighting. Additionally, test out one of the top ring lights available. More lights can be added as you progress with your live streaming journey. Simply consider your requirements for live streaming and make changes accordingly. Head over to Flutin to begin your experimentations today.
Related Topics:
Join our official streaming community and get tips to improve your social presence, hacks to increase brand engagement and generate more revenue.